Introduction: Why Aux Sends and Returns Matter
Picture adding effects while mixing a studio track or during a live performance without altering the base sound. This is exactly where aux sends and returns provide the most value. They enable the precise forwarding of audio signals, ensuring optimal application of effects such as reverb, delay, and compression.
However, many aspiring engineers tend to overlook it or, even more worryingly, misuse it completely. Whether you’re mixing a live sound in a crowded venue or adjusting tracks during a studio session, knowing and mastering aux sends and returns will distinguish the good from the best.
In this guide, we’ll break down how to use aux sends and returns, why they matter, and how to use them like a seasoned pro. You’re working with either a live sound mixer or perhaps some fancy digital audio workstation.
We’ll share real-world examples, tips from the trenches, and a few common mistakes to avoid.
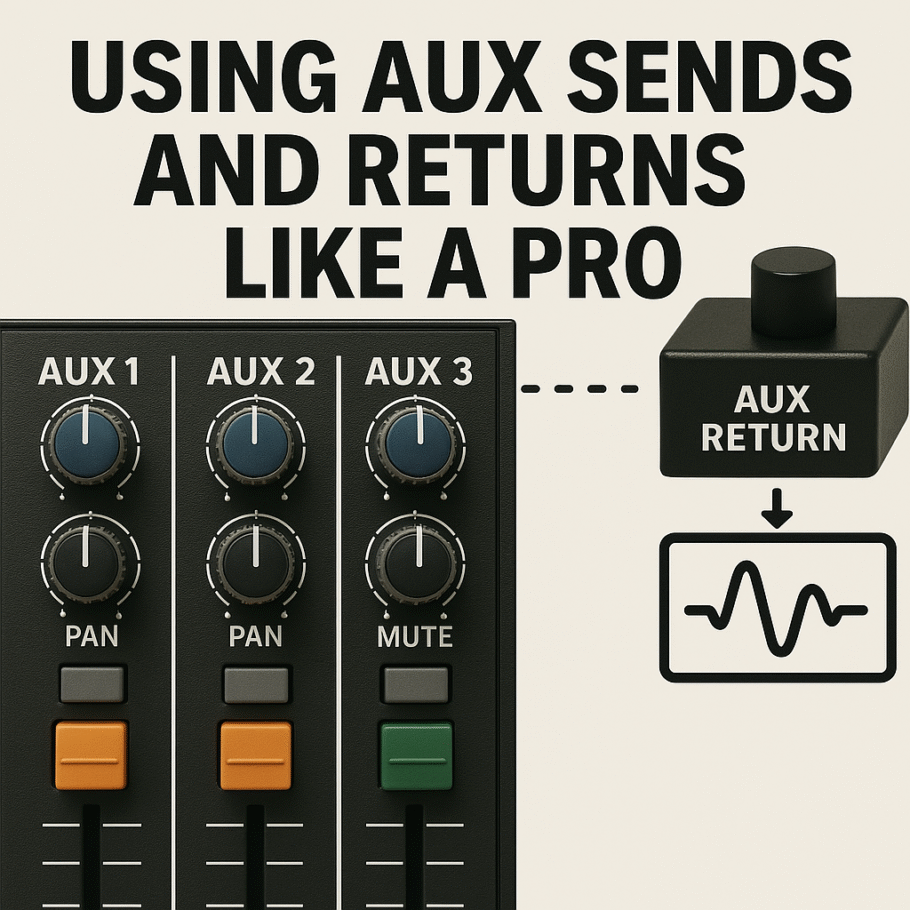
1. The Basics – What Are Aux Sends and Returns?
Auxiliary sends and returns enable you to apply effects or create custom monitor mixes due to its parallel signal path function.
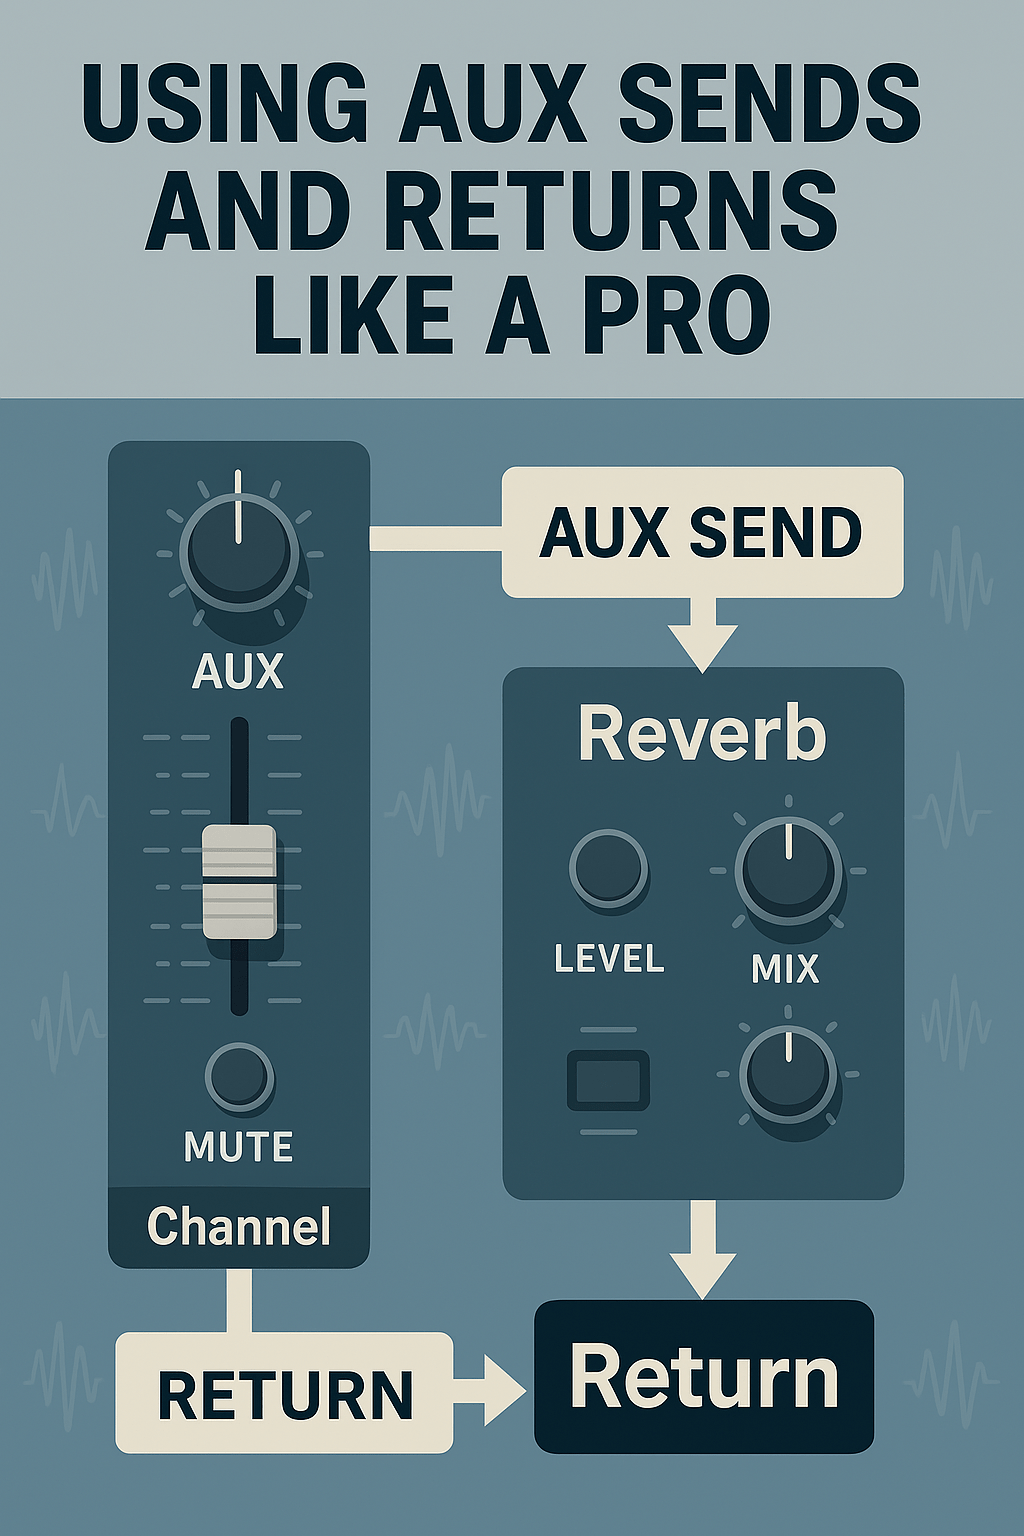
Aux Sends: These allow you to send off a part of the channel signal to a new location instead of routing it through the channel’s main output. This is ideal for routing signals to external effect processors or creating monitor mixes.
Aux Returns: These ports receive incoming signals that have been altered externally. It is akin to setting up a loop: you output a signal for processing (for example, to add reverb or delay), then you return it back to the mix, merging it with the original audio.
Consider, for instance, how you would send a singer’s voice to a reverb unit without interrupting the main vocal signal in the mix.
2. Types of Aux Sends: Pre vs. Post Fader
The selection of pre-fader or post-fader aux sends is based upon the requirements of the mix:
Pre-Fader Sends: The signal is sent prior to the channel’s fader taking any action on it. Preferable for sent monitor mixes since it guarantees that musicians hear a sustained level irrespective of any changes made to the fader. The monitor mix stays intact because they are not impacted by the channel fader, thus guaranteeing that the changes to the main mix do not impact the monitor mix.
Post-Fader Sends: The signal is sent after the fader, meaning the gain is taken away from the send level. They are perfect for effects such as reverb and delay, where it is critical that the effect follow the dynamics of the mix. The effect is proportionally adjusted as the fader is raised or lowered; the amount sent to the effect changes correspondingly.
3. Practical Applications: How Pros Use Aux Sends
Creating Monitor Mixes
For each performer, live sound engineers use custom monitor mixes with aux sends fitted to their personal requirements. Every musician can obtain a specific mix tailored to their unique tastes without compromising the mix sent to the house speakers.
Adding Effects Without Cluttering the Mix
Vocal reverb can also be done off the channel aux bus and returned fed out of the reverb aux channel. This technique allows the tracks to be mixed more seamlessly without cluttering the mix bus subgroups.
Parallel Compression for Punchy Mixes
Parallel compression makes use of aux sends because a compressed version of a track is blended with the uncompressed base version to increase depth, impact, and power.
4. Configuring Aux Sends and Returns on Your Mixer
Step-by-Step Guide:
- Locate the aux and send knobs quickly on your mixing board.
- Pick pre-fader or post-fader according to specific requirements carefully.
- Send it externally to some processor like a reverb unit or compressor, obviously outside.
- Adjust the return level, blending the processed signal quite subtly with the original signal in varying proportions effectively.
- Tweak the mix carefully, ensuring balance and utter clarity prevail somehow.
5. Pro Tips and Common Mistakes to Avoid Them
Pro Tips:
- Label Your Sends and Returns: Clearly labeled sends and returns prevent confusion and mistakes during intense live performances or recording sessions under extreme pressure.
- Use Grouped Effects: Use reverb judiciously across channels rather than spawning a gazillion separate reverbs for each channel needlessly every single time. Blend a single reverb subtly across all vocal tracks and adjust levels accordingly with extreme care in the mix. It saves CPU remarkably and spawns a rather cohesive sound eerily beneath layers of reverb.
- Automation: Automate aux send levels in DAWs for dynamic control of effects throughout a track, yielding surprisingly varied results most times.
- Parallel Processing: Aux sends facilitate parallel compression rather effectively by routing a signal through a return where it’s compressed heavily and then blended with the original audio.
Common Mistakes
- Overloading the aux send: Sending everything recklessly into the same reverb regardless of sonic context muddies the mix badly.
- Ignoring gain staging: Fader settings get ignored and monitor mixes get messed up by accident during frantic performances behind sound consoles.
Using too many effects: Aux returns get severely overloaded, resulting in gnarly distortion and phasing issues down the line somehow.
Conclusion: Elevate Your Mixing Game
Mastering aux sends and returns utterly transforms mix quality drastically with really significant professional results. Crafting monitor mixes and using parallel compression with effects adds depth, and these techniques help mix with precision creatively.
Wrapping Up – Becoming a Master of Aux
Aux sends and returns are utilized heavily in professional audio engineering circles, evidently showcasing a certain level of technical proficiency. You’ll eventually get the hang of them, and they’ll become ridiculously easy, and you’ll wonder how you mixed stuff without them before. Aux routing offers flexibility and control by adding rich dimensional effects or building personalized monitor mixes that serious mixers crave.
Next time you’re at your console—whether it’s physical or digital—take a closer look at your aux section. Start small, experiment with effects, and pay attention to the differences in your mix. Over time, your ears will thank you, and so will your listeners.
For more tips, tutorials, and professional advice, stay tuned to *Audio Mixers*—your go-to resource for everything mixing.